Wednesday, October 26, 2005

View from Bald Knob at Mountain Lake


View from Bald Knob, Oct. 25, 2005
In this view, we are looking north from the top of Bald Knob. I wanted to get some kind of scenic shot, but the sky was rather gray and "boring." As a result, I decided to crop out most of the sky, except for a small sliver to give perspective. I decided to emphasize foreground instead, whichadds some three-dimensionality to the photograph. As with the photograph of Bald Knob rocks, I used my 24-85 zoom on this one. For this shot, I adjusted the zoom to 70 mm to isolate just the "right" amount of the rocks.
Some hints of fall color are visible in the background, as are frost-covered trees. I look foward to returning to this location many times next spring, not only for scenic shots like this one, but also to find closeups and mini-landscapes with wildflowers. I have heard there are lots of neat trails around here. I am glad that I finally took a trip to Mountain Lake!

Bald Knob at Mountain Lake


Bald Knob, Oct. 25, 2005
When I finally made it to the top, I was pretty excited. I had been looking forward to seeing this location for quite some time, and finally I was there. If you look closely at the shrub in front of the rocks, you can see that it was pretty windy on the top of Bald Knob. Ideally, I would wait for the wind to stop before snapping the shutter. But this time around, I kind of wanted to let the motion of the branches show up in my frame. So I set the f-stop to 18 and used a shutter speed of 1/20 sec.
For the first time today, I put my 200 mm lens into the camera bag and took out my 24-85 zoom. I set the lens to 52 mm and stepped back about 30 feet from the rocks to get this shot.
I like the way this photograph seems to almost resemble "black and white." There just wasn't much color on Bald Knob today, thanks to the gray sky and the snow.

Blowing in the Wind


Witch Hazel Leaves, Oct. 25, 2005
While shooting these leaves, I kept thinking of Bob Dylan's song, "Blowin' in the Wind," because that's exactly what these witch hazel leaves were doing! But I just had to try and get a photograph of these frost-covered leaves. I loved the way the frost forms a pattern along the veins of the leaves.
As I walked along the trail, this branch was hanging down just in front of my face. I held the camera in my hand to frame this shot. Of course, the wind made this task somewhat challenging. I decided that I wanted to TRY and get all three leaves in the frame pretty much exactly the way they appear in the photograph above.
Once I knew what I was trying to capture, I set up the tripod and mounted the camera in approximately the best spot. I opened up my apperature to an f-stop of 8 so that I could speed up the shutter to 1/80 of a second. I had to make the shutter quick to stop the motion of the blowing leaves. Still, it was a challenge to snap the shutter at the exact moment that there was a lull in the wind and the leaves re-positioned themselves in my frame. I held the remote control device in my left hand and continually adusted to focus with my right--this is the opposite how I normally focus, but I had to point the IR remote toward the sensor so it would work every time without hesitation, and using my left hand is the best way to do that.
The leaves tossed and turned constantly, pausing for a moment, and then moving again. I adjusted, snapped, and waited, then adjusted, snapped and waited, etc. Several shots came out focused, but only part of one leaf was in the frame. Others came out in the frame, but not quite in focus. This photograph turned out the way that I wanted, the right composition and in focus.
I consider this shot a combination of luck and persistence, as well as a little bit of skill. Clearly, I had to be familiar with how my camera works and how to set the controls so that I could increase the odds of getting the shot that I wanted. And, this is a FULL FRAME image with absolutely zero cropping around the edges. This IS the shot that I got, with just a minor adjustment to contrast! (Can you tell that I am pretty proud of this one?) This may not be my best photo of the day, but it sure is one of my favorites!

Frosty Twig on Bald Knob Trail


Frosty Branch, Oct. 25, 2005
This was a difficult shot due to the strong wind, which kept wiggling this frosty stick--moving it in and out of the frame, and in and out of focus. But I set up the camera on the tripod and waited for a lull. Then I crossed my fingers and pressed the remote control device. I tried several shots, and I like this one best.
As I walked up the trail, I enjoyed the sight of frost covered branches everywhere I looked. It reminded me of the way tree branches look shortly after a snowfall. It was a peaceful scene, except for the bone-chilling wind.
This stick is about the diameter of a pencil, so you can get the idea that I was up pretty close for this shot. Of course I used my 200 mm micro lens. I was lucky to catch this image when the branch was holding still because I used an apperature of f-20 at 1/15 second.

Christmas Fern Under Snow


Christmas Fern, Oct. 25, 2005
As I ascended the Bald Knob Trail, the snow got deeper and deeper. It was very exciting to me because I had no idea this morning that I would be taking a walk through the snow.
This Christmas Fern frond attracted my attention because it reminds me of the image of a dinosaur's fossilized backbone. I also like the way the frond in the back left corner kind of imitates the shape of the primary subject. Since Christmas Fern is an evergreen, it is not unusual to see one of its fronds burried by snow.

Frosty Fern at Mountain Lake


Frosty Fern, Oct. 25, 2005
I was surprised to find a layer of snow as I walked up the Bald Knob Trail. I just had to stop along the way to photograph evidence of the strange event--such as green fern leaves covered with snow. Now, if this was Christmas Fern, I would not be suprised to see green snow-covered leaves because Christmas Fern is an evergreen. But this fern looked like Lady Fern, but I will need to go back this coming spring to check it out for sure.

Fog Rises Above Mountain Lake


Shoreline of Mountain Lake, Oct. 23, 2005
The fog rose like puffs of smoke from a fire. I caught this view of the Mountain Lake shoreline when the fog cleared for a moment. I spent quite a while at this location and thought that this would be one of the few times that a video camera would do a better job than a still camera of capturing the dynamic moment. Toward the top of the frame, you can see snow-covered evergreens!

Misty Fog at Mountain Lake


Misty Fog, October 25, 2005
After photographing a snowy hillside, I turned my attention to Mountain Lake. Fog was rising from the surface of the lake and floating off slowly in the wind. As a result, the scene kept changing, and even successive frames looked very different from one another. I like this shot because it captures the fog floating behind the empty branches of the bare tree toward the middle of the frame. The fog provides a nice contrast to the dark, bare branches and helps set off the colorful tree beside it.

Mountain Lake's First Snowfall


First Snowfall, October 25, 2005
I almost stayed home today because it was rather cold and the sky was almost completely cloudy. But around 9 AM, I noticed that the clouds were starting to break up just a little and the sun was peaking through. A few distant mountains seemed to glow as the diffused sunlight lit them up. So around 10 AM I went out, and I headed to Mountain Lake.
Mountain Lake is a resort, but they also have trails that are open to the public. I just found that out earlier this week, having spoken with someone who had been there. I was eager to see the Bald Knob and some other neat places out there. As soon as I got out of my car and looked west, I saw a snow-dusted mountainside, and decided to use my 200 mm lens to isolate the colorful trees shown in this photograph.

Tuesday, October 25, 2005

Splash of Color in the Smokies


Fall Color, October 23, 2005
I found this shot along Little River Road near the trail head to Laurel Falls. I like the abstract nature of this image and the way the red seems to meander its way through the frame. The lighting was still pretty good at this time of the morning, around 11 AM, but it was starting to get a bit too bright (causing too much contrast on the scene). As with all the other Smoky Mountain pictures, I did not crop any of these after snapping the shutter. Each Smoky Mountain frame that you see on this website appears the way I framed it in the field using my Nikon D-70, mounted on a tripod and my patience. Actually, to be clear about this: I checked out the possible framings first while holding the camera with my hands. Once I found a framing that I liked, I then mounted the camera to the tripod, and carefully adjusted the image to get it the best that I could.

Dogwood in Smoky Mountains


Dogwood, October 23, 2005
I found this dogwood along the Little River Road near the trail head to Laurel Falls. I wanted a little more light on the subject, but there were lots of clouds in the sky as well as shadows from trees uphill toward the east. For a few weeks now, I have wanted to capture the dogwood's bright red leaf color, as well as its bright red berries. Finally, this situation presented itself, not as an ideal opportunity but still one that was worth a try.
As with most shots I found that day, I was using my 200 mm micro lens. I did not need its micro (i.e. macro) capabilities, but I used the lens anyway because it is so sharp. This lens would not have allowed me to catch the landscape with the moon (see below), which I found at the same location, but it did allow me to really narrow things down and focus on one small aspect of the scene. Also, I used a polarizer to cut the glare off the surface of the leaves and to bring out the warm red color.

Shelf Fungus Along Little River


Shelf Fungus, October 23, 2005
After focusing on some colorful branches, I turned my attention downward. I found this shelf fungus attached to a fallen branch that was just laying near the edge of the stream. I used my 200 mm micro lens, and got really close. I got some closer shots too, but decided this was the framing I liked best. I set up the camera so that the branch would appear close to the diagonal between opposite corners, but just a little bit off. I didn't want TOO much symmetry, but I did want the branch to appear at an angle rather than horizontal or vertical within the frame.

Fall Color Along Little River Road


Fall Color, October 23, 2005
Down at the lower altitudes of the Smokies, fall color was just starting to arrive. From time to time, one branch would appear more orange or red than the others around it. I decided to photograph this set of branches just after photographing the rocks on Little River. I happened to turn around and notice that the sun was striking these branches from the side, and since it was only about 9:30 AM, the sunlight was still a little warm and not too harsh. I like the way the sun kind of helps make the leaves glow just a little, and the way it lights the sides of the tree trunks too. I like the way the trunks kind of lean into the frame, rather than standing completely vertical. I did not tilt the camera to achieve this look. I used a "double bubble" (level) to make sure that the frame would be level. Whenever I shoot any type of scenery, I try to remember to use the level.

Leaf in Little River


Leaf in Little River, Oct. 23, 2005
Usually, during the spring, I am so busy photographing wildflowers that I don't do much photography of water. But this was fall, and I was trying to "branch out" just a little. After photographing the mini waterfall (see below), I decided to turn my attention to the water flowing past the rocks in the stream. It was difficult to visualize how the final photograph would appear because the water was moving rather quickly. And yet, that is part of the fun!
So, even though this is far from my "favorite" photo of the trip, I still think it is kind of interesting. I like the way everything seems to be moving except for that one lonely leaf. If I were to reframe this shot, I might shift the frame to the right just slightly so that the leaf would be about one third of the way from the right edge of the frame instead of being more like one quarter or one fifth of the way. The leaf seems just a bit too close to the edge. But hey, that's ok. This is all part of learning.

Closeup along Little River


Little River Closeup, Oct. 23, 2005
I found this image just west of the road that leads to Elkmont along Little River Road in the Smoky Mountains. I was standing on the north side of the stream, looking south. This little tiny waterfall marks the intersection of two streams. The stream heading north, toward Little River, has a rather nice waterfall about 300 feet (100 meters) further into the forest, but I couldn't get a good view with the leaves still on the trees. So instead of a dramatic waterfall, I just got this little tiny one. Since I used my 200 mm lens, I was able to fill the frame with a couple rocks that were about the size of baskeballs, maybe a little bit larger.
It was somewhat dark in this part of the stream, so I used a slow shutter speed (2.5 seconds). As a result, the water appears soft and silky because you can actually "see" its motion. Sometimes I use a quicker shutter speed to "catch" the water in a single spot, thus retaining more of the choppy texture of the water that is normally seen with the eye.

Monday, October 24, 2005

Fall Color at Laurel Falls Trailhead


Laurel Falls Trailhead, October 23, 2005
I found this view on Sunday morning along Little River Road in the Smoky Mountains. I was actually standing in a parking lot, looking toward the trailhead of Laurel Falls. If I had lowered the frame, you would have seen LOTS AND LOTS of people and their cars. I read in a publication about the Smokies that the last three weeks in October is one of the busiest times of year.
I like this shot because it helps portray the feel of the forest on a beautiful sunny day. The moon is a nice addition. I like the way each different tree has its own color. The maple is very red, while the other trees are still mostly green. And one tree toward the left is already bare.

Fall Color in the Smoky Mountains


Ivy Climbs a Tree, Oct. 23, 2005
Fall is late this year in the Smoky Mountains. Down in the lower altitudes, many of the trees are still green, or they are just barely starting to change to red, orange, or yellow. As you drive up the 11 mile road toward Newfound Gap (from the Gatlinburg side), the fall color increases. It's like driving ahead through time.
I found this scene about halfway up, or maybe just a quarter of the way. I would have preferred to have the foreground lit instead of the background, but there were lots of clouds and not a lot of time--and the sun was moving behind the mountain so it's not like I could just wait a few minutes for the light to return. (I will have to return next year to try again!)
I got this shot because I love the contrast between the ivy on the tree trunk and the green leaves all around it. I think that the ivy is Virginia Creeper, rather than Poison Ivy because the leaves are a deep, almost maroon or burgandy. From what I have noticed, this is the color of Virginia Creeper. Poison Ivy leaves tend to turn more of a reddish orange with a touch of yellow before turning brown and dropping off the vine.
However, I was not close enough to this subject to check it out for sure. I was standing at one of the overlooks using my 200 mm lens.

Sunset in the Smoky Mountains


View from Newfound Gap, Oct. 23, 2005
I spent the weekend in the Smoky Mountains to do photography. Partly, the goal was to find some fall color. Another goal was simply to go there and explore. There are so many things that could be said about the Smoky Mountains and the amazing forests there. But for now, just enjoy the view. I will try to post more FALL COLOR shots throughout the week. (And yes, I do plan to return there during the spring.)

Friday, October 21, 2005

Trillium


Large Flowered Trillium, April 19, 2005
There are lots of trillium species and they all share similar characteristics. Above a whorl of three leaves, is a flower with three petals. Some trillium flowers are white, some are pink, and some are maroon. All of them are somewhat rare and serve as indictors of a healthy forest understory.
This large flowered trillim is known for its, well, LARGE FLOWERS! It's Latin name is Trillium Grandiflorum. Sometimes the Latin names are fun to say and easy to remember. I found this trillium near the Appalachian Trail in southern Virginia, but I have seen this species in Michigan and also Iowa. The flower starts off as a white-pink color that continues to get darker and darker pink as the flower ages. As you can guess, this flower is just a couple days old.
I often find pollinators visiting trillium flowers, but it's hard to get a good photograph due to the dark conditions on the forest floor, which requires a somewhat slow shutter speed. Usually insects appear blurred. Perhaps next year I will try to capture images of insects using fill flash. But up to this point, I have stuck mostly with insect-free plants on a calm and overcast day.
This photo was taken on a day when there were scattered clouds in the sky. I got a few shots with full sun and several more with partial or complete shade. This image shows a little bit of the overexposure that can be caused when sunlight sneaks into a photo. If you look just under the flower petals where the leaves come together at the stem, you can see what I mean. Some photographers would call this a "hot spot" because the sun burned through or overexposed the "film" (but in the case of digital photography, I should say "sensor"). I am sure that I could have darkened that distractingly bright area of the image using some trick or tool in Photoshop, and someday I might even try. But for now, I just wanted to post the photograph without worrying about such small details. Besides, I don't know enough about Photoshop yet to do it. And I was eager to start posting images again on this website because posting images is lots of fun.

Friday, October 14, 2005

Fern Frond Fiddlehead


Fern Frond, April 19, 2005
I enjoy this image of the fern "fiddleheads" unrolling during spring. Ferns begin opening up a few weeks after hepatica and spring beauty start bloooming, and they slowly un-curl to reveal long "feathery" frond (leaf) of various shapes and sizes. Some of the more common ferns include Christmas fern, maiden hair fern, interupted fern, cinnamon fern, lady fern, and woodsia. I suspect this fern shown here is an Christmas fern (which stays green through the winter), but I want to recheck the plant before saying for sure. I posted two images of interupted fern on this website back on September 29th. Check the ARCHIVE "September 2005" to see more.
In this shot, only one fiddlehead is in focus, while the other is somewhat out of focus. This was intentional. I tried to make the left fiddlehead sufficiently out of focus to make it obvious that this was my intent, but not so out of focus that the fiddlehead would lose all details of its general shape. I like the way the left fiddlehead, without overlapping, replicates the shape of the fiddlehead on the right.

Mid-Spring Forest


Jefferson National Forest, April 19, 2005
This shows the southern Virginia forest during "mid-spring," which happened this year during mid-April. The spring wildflowers began blooming back in mid-March, and more or less finished by mid-May. Hepatica was one of the first to bloom, and Woodland Phlox was one of the last.
As you can see in this photograph, the leaves are starting to grow on the tree branches, but still have a long way to go. During this part of the season, the forest floor receives quite a bit of sunlight during the day. This provides energy for the wildflowers, which helps them grow, store food, and produce seeds. Sunlight also warms the forest floor so that pollinators, like bees, can travel around.
The exact timing of spring varies from place to place, and from year to year. By studying a common wildflower, like spring beauty, it is easy to make comparisons. In the upper peninusula of Michigan, spring beauty begings blooming during early May, whereas in eastern Iowa, it typically begins blooming at the end of March. Some years, winter hangs in a little longer than others, which can delay spring beauty (and other wildflowers, and leaves on the trees) by as much as two or three weeks.
By mid-spring, when the leaves start growing in the branches on the trees overhead, spring beauty reaches full bloom. When the leaves of trees reach maturity, filling the forest floor with shade, then spring beauty wildflowers go dormant until the following year.

Virginia Bluebell Flower Buds


Virginia Bluebells, April 18, 2005
Here are some Virginia Bluebell flower buds, somewhat early in their blooming season. The buds start off looking quite pinkish in color, and get more and more purple-blue as they develop and get larger. Eventually, the bluish flowers open up into a "bell" shape, hence the name bluebell. During 2005, this happened toward the last week of April and first week of May. I don't have a recent photo showing the more mature flower, but you can probably find a picture in some kind of field guide. I did get some photographs of mature bluebells about 8 years ago at Bowman's Wildflower Preserve in eastern Pennsylvania. This year, the timing was not convienent for me, partly because I was getting ready for my trip to Utah (see Claret Cup, below).
The lighting for this photo is a little bit too harsh. The contrast is a little bit too high. Ideally, the highlights on the flower petals would be a little more subdued, so they would appear a little "softer" and richer in color. Similarly, the shade would be just a tiny bit less dark. Still, I like the general composition (arrangment of the flowers) of this photo, so I decided to post it here.
This flower can be found in the woods, but is often also grown in gardens. It can grow among the grass blades during the spring, and by the time the lawn is ready to be mowed, the flowers are typically done.

Wednesday, October 12, 2005

Claret Cup Cactus Flower (Utah)


Claret Cup, May 12, 2005
Okay, I know that claret cup cactus flowers don't exactly fit my theme "woodland spring," but at least this is a spring-blooming wildflower! I found this claret cup blossom in a dry desert-like area not far from Boulder, Utah. I spent ten days in that area back in May to attend a Rod Planck Photography tour. In addition to the tour, a couple friends and I stayed on for a few more days and did additional photography on our own. We photographed a lot of wildflowers, canyons, sunsets, sunrises and lots of other things. I addition to doing photography, we found a really nice coffee-shop-book-shop in Boulder.
I have dramatically cut the rate at which I post images during the past week because I have been SOOOO busy trying to learn more about working with digital images. I have mentioned some of this stuff already, in previous posts. I do plan to get back to my spring woodland wildflower photos soon. One step at a time. Meanwhile, I have decided to post miscelaneous other images just for fun.
Until I start working with SCANNED SLIDES, you can pretty much assume that each image starts as a Nikon NEF (raw format) from my Nikon D-70. Once the image file is on my hard drive, I open the file with Nikon Capture Editor software and adjust the contrast and color balance, if necessary. It seems that every image needs to have its contrast increased just a little to avoid having the lighter areas appear too dark and drab. Sometimes I adjust the color balance just a little for the purpose of trying to get the colors to better represent the original color of the subject. And that's about it. If there is a dust spot showing on the image, then I open the image in photoshop and try to fix it there. The final step in preparing to post the photo on the website is to set the resolution at 72 ppi and save the image in JPEG format. By using 72 ppi, the image stays clear and crisp for viewing on a monitor, and file size becomes small enough that it can download in a reasonable amount of time.

Sunday, October 09, 2005

Praying Mantis (at f4)


Praying Mantis, Sept 29, 2005
My lens was wide open for this shot of the praying mantis walking through my back yard. It was evening, and getting dark, and the mantis kept moving at a pretty steady pace. I could predict most movements, but still had to work hard to get the face in focus. Due to the movement, I wanted to make sure the motion was frozen for the frame, so I picked a shutter speed of 1/100 and therefore needed to open up my lens to f4. I love the way this mantis looks THROUGH THE CAMERA, so it seems, and INTO MY EYES. The wide open aperture limits my depth of field (the depth into the image that can be in focus at any one time) but I think it's kind of neat the way the mantis face seems to emerge from its blurry body. This adds an interesting three dimensional quality to the image.
And yes, I was using my tripod, without flash. (Flash would have created a lot of sharp shadows, and would have caused the mantis to be much brighter than the background, to the point of making the scene look rather fake.) After loading the image onto my computer, I increased the exposure somewhat using Nikon Image Capture editing because the face of the mantis was just too dark to see clearly. Aside from that, this is pretty much the way the mantis looked on Thursday evening last week.
I know this has nothing to do with woodland spring. But that's ok. Truth is, I love all kinds of nature photography all times of year. I will keep posting miscellaneous current stuff as well as some other spring photos from earlier this year. (I thought about breaking this into two websites: WOODLAND SPRING and OTHER NATURE PHOTOGRAPHY, but for now, I prefer to stick with just one.)

Mabry Mill on the Blue Ridge Pkwy


Maybry Mill on Blue Ridge Pkwy, Sept. 15, 2005
Mabry Mill is located near mile marker 175 on the Blue Ridge Parkway. Visitors can walk around and check out the way an old mill works. There is also a restaraunt and bathrooms nearby. In this photograph, we are looking north. The mill is on the east side of the road.
I already posted this photograph on the website back in September, but since that time, I have gone back to the original file and re-saved the image at 72 ppi (see below for explanation). My rate of posting new pictures has slowed this week because I have been so busy reading and learning about how work with digital images. My goal is not to make fance composite images in which I superimpose such things as a tiger, whale, and rainbow up in the sky. My goal is simply to take the "raw" image from the camera and make small adjustments so that it provides a more accurate representation of the actual scene.
The most common adustments that I make include 1) increasing the contrast (to make the photograph less even-toned grayish and drab) and 2) adjusting the color balance a little to make sure the greens look about the right shade of green and the pinks look the right shade of pink, etc. I often do this work using Nikon Capture, and then resave the copy in the Nikon raw image format (NEF).
Finally, sometimes there is a speck of dust appears somewhere on the digital image because dust literally sticks to the sensor inside the camera (the sensor is like the "film") and blocks the light when the shot is taken. A dust speck usually appears as a gray or black spot or blotch. If the dust speck happens to be located in a blue part of the sky or in some other area where the color is rather uniform, then the defect is very noticable and must be removed. If this is the case, I will remove the defect it by "covering" with a "healing brush" tool in Photoshop. The healing brush acts like a paint brush, and covers the defect with an appropriate color to match that part of the image.
I don't plan to turn this website into a technical how-to type of place. I am just giving you an idea of what I have been doing these days and why so few new photos have been appearing. By doing this groundwork now, I will be able to do a better job posting images in the future. I plan to start posting images pretty regularly again sometime this week.

Friday, October 07, 2005

Mountain Laurel (saved at 72 ppi)


Mountain Laurel, June 7, 2005
I have posted this image before, but under different size and resolution settings. I have spent much of this week reading about digital imaging and posting images to websites. Mike and Ron have helped me a lot as I have tried to figure this out. THANKS to both.
Anyway, I went back into photoshop with the original Nikon raw-format (NEF) image, which I had safely stored on my hard drive. (No matter what type of editing I might to do my images, I ALWAYS keep the unedited originals in folders, which are stored by date and location.) So anyway, I went back to that file, made a few adjustments for color and contrast, and then saved the image with a resolution of 72 pixels per inch (ppi). This immediately shrank the file size, but still gave a good, clear image on my computer screen.
I took that file with 72 ppi and loaded it up on this website. (The website software automatically turned into a file with 96 dpi for some reason and resuced its size a little bit more.) When I clicked on the mountain laurel image, the image got BIGGER and still retained pretty good clarity! So, try clicking on this mountain laurel picture (above) and then go find the one listed in September 2005 archives and do the same. I think you will be amazed at what a difference it makes to take the SAME image, but to to save it using different settings. For what it's worth, however, if a person tries to print a photograph with a resolution of 72 ppi, chances are it will look pretty distorted. For printing, the file needs to have much higher resolution... though I don't know exact numbers yet.
This type of techno-talk is rather new to me, and I certainly did not plan to incorporate it into my WOODLAND SPRING website. But now that I am shooting digital images, I suppose this will become part of the process of photography. File size and resolution (ppi) are just two new aspects of "photography" that I have only started thinking about this year.

Wednesday, October 05, 2005

Taking a Cat Nap


Striped Tabby Cat, 1993
Back in Iowa, my cat used to love to take afternoon naps in a "sun spot" beside the west-facing window of my old farmhouse. She would curl up on a small chair and sleep. One day I decided that I just had to have a picture of her in this spot. And though mostly I was a wildflower photographer at the time, I had this great idea of filling the frame with her fur--something I had never done before. I am glad I did because this is one of my favorite shots of my beloved cat.
I have been talking with some photographer friends about digital images, particularly such topics as file size (megabytes, kilobytes) and pixels per inch (ppi). I have learned a few things that have caused me to reconsider how I go about getting pictures ready for the website and printing, which means I will need to slow my pace for a while as I learn more about this. Apparently, a good image on line needs to have about 72 ppi, but should have a pretty good file size if you want to see the details clearly. For printing, of course, the ppi needs to be much higher. With printing in mind, I have been saving my images at much higher ppi and at various file sizes too--depending on my utimate plan for the image. This will explain why some pictures look better when you click on them to see an enlargment, and other pictures do not. Etc etc.
I could continue to explain this stuff, but that would be like first grader trying to explain calculus! I think I will take a day off from adding pictures to the website and will work on increasing my knowledge of how to best work with digital images. Please return later this week, when I hope to have more great images to share.

Tuesday, October 04, 2005

Bloodroot


Bloodroot, April 9, 2005
This is a hand-held shot of bloodroot, using my Nikon D-70 and my 24-85 zoom lens. The lens has a macro setting, which allows me to focus on a subject that is rather close.
I was taking a nature walk on this day, and not planning to do any serious photography, but I was glad that I could hold the camera steady enough to get a pretty good shot. I prefer to use my tripod when photographing wildflowers, but sometimes when the tripod is unavailable I still want to give it a try.
One problem with this image is that the sun was shining a bit brightly, as can be seen from the obvious shadows behind each flower. With bright sun on a white flower, it is difficult to show the texture of the petal because the brightest areas of the petal often get "blown out" or overexposed. Due to the bright lighting, the contrast between the white petals and the background is a bit higher than I would like it to be. Still, I like this photo and enjoy looking at.
Bloodroot gets its common name from the fact that its root (and stem) contains a sap that is an orangey-red, like the color of blood. But you don't have to damage the plant to see it. All you need to do is look closely at a back-lit leaf. The veins themselves appear somewhat orangey-red as they show through the green surface of the leaf.
I plan to get some really good photos of bloodroot posted on this website one of these days. It is a cool plant and I have some nice slides showing various stages of its growth, as well as various closeups of the leaves and petals.
One of the best bloodroot photographs I've ever seen is posted on the Rod Planck Photography website in his GALLERY section called PLANTS. This LINK will take you directly to the PLANT GALLERY page, but you will need to click "view more plant photographs > >" one time to reach the page that shows bloodroot. Rod's bloodroot image is in the top row, in the middle. It is a vertical closeup showing two bloodroot flowers in opposite corners of the frame. Rod's work on that image is an example of great lighting and great composition!

Larger Image Files

One of my photography friends told me that he enjoys looking at my photos on my website, but that he is disappointed that the images are so small. I agree with what Ron said, that it would be nice to be able to click on the image and see the image enlarged. Well, I figured out how to do it, which means they will download a little slower if someone has a slow internet connection. But once the images arrive to your computer, you can single-click them to get a better (full screen) view. You can try this out on the ant lion picture below, which I just re-uploaded earlier today.
However, I would like to point out that the larger images are still relatively small, and they do show some distortion and poor resolution. For example, my original ant lion picture (which is a scanned slide) started off at 2.5 megabytes, but the image on the website is only about 220 kilobytes. This means that only about 10% of the original information remains, and some of the clarity is lost.
I make this point primarily for people who might look at the image on their screen and wonder why the heck I am talking about such great razor-sharp clarity of my Nikon lens. Well, if you actually saw the original image file (or, better yet, the original slide) you would see what I mean.
Having said that, there still may be times when I post an image that isn't as clear and crisp as I would like, but there will be some reason for it. For example, that tiny pink spring beauty sprout that I posted October 2 is not as clear as I would like, but it serves a purpose nevertheless. It was a hand held shot of something VERY SMALL, and I love that photo for what it shows of the early plant even if I could never turn the image into a poster for my wall!
On that note, I should return to my hard drive and start preparing more images to post. I have SOOOOOOOO many digital images and slides that I could work nonstop for a year just sorting through them and deciding which ones I like best! Since I don't have the luxury of unlimited time, I will just do the best I can. I will continue working with this year's digital images, but then I really do want to start going through some of my more recent (2002-2004) slides!
Thanks again for all the feedback and advice that people have been sending my way. It is helping me make a better website... Special thanks to Canadian Dude, Ron M, and David J. (Each one of you knows how you have helped inspire me and/or improve the quality of the site!)

Monday, October 03, 2005

Ant Lion Hole in UP Michigan


Ant Lion Hole, August 12, 2002
I made this photograph during my first trip to the upper peninsula (UP) of Michigan. This was also my first Rod Planck Photography workshop. And it was lots of fun. Some of my classmates were photographing the remains of a sunrise when I found this interesting ant lion hole among the pine needles on the forest floor. Let's just say that I have a tendency to notice things that other people miss, and visa versa!
Ever since I was a kid, I'd thought that ant lions were really cool. I guess I'd seen them in New Hampshire and I learned about them from my brother Vic. He explained to me that the ant lion would build this this vortex out of sand and wait at the bottom for some unspecting ant to step in. Then, along with an avalanche of sand created when the ant tried to escape, the ant would tumble down into the center and become the ant lion's guest of honor for dinner! (It reminds me of the big sand pit on the sand planet in Star Wars 6, where Jabba the Hutt tried to dump Luke and his friends as punishment for reviving and rescuing Han Solo!)
This may not be the most photogenic photograph, but I sure like the detail, texture, and colors. I was using Fugi's Velvia 50, having switched from Kodachrome 64 only a couple of weeks before!
Not only was I using new film, but I was also using a new camera. This was my first real photo shoot using my Nikon N-80 and 200 mm micro lens. I was thrilled to be able to bring the image so close, and to obtain such razor sharp clarity. Since wind was not an issue this far down on the forest floor, I was able to set the camera for a long exposure (maybe 1 second?) and keep the aperture very small (f 22).

Brown Bat and Poison Ivy


Brown Bat, April 1996
I was walking with a friend through a wonderful patch of forest along the Cedar River in Linn County Iowa. I was staring at the ground and checking out all the wonderful sprouts. My friend stopped and signaled for me to look left. I was puzzled at first because I didn't see it. I saw the tree, but not the bat. Once I realized what was hanging there on the tree, I got my Cannon AE-1 with 50 mm macro lens ready as carefully and quickly as I could. I snapped the camera on to the tripod and and adjusted the height as close as I could to the height of the bat. After setting the exposure and focus, I snapped a shot, and moved closer. Then I refocused, snapped again, and moved closer. I continued this procedure until the bat nearly filled the frame, and still the bat simply hung there motionless.
One of my favorite things about this photo is that, in addition to showing the bat, it also shows early sprouts of a poison ivy vine growing along the tree trunk. I might not want to touch it, but I sure think that this is a pretty plant. I love the way these miniature leaves look, so delicate, shiny, and pinkish-red, when they first come out. I have better photos showing early this stage, closer up, but I have not yet scanned those slides.
One of the most frustrating parts of this whole job is the time it takes to get my images ready to show and share. I have so many slides just waiting to see the light of my scanner, which will turn them into electronic images for posting on this website and pasting into my book. Just one year ago, last month, I made the switch from film to digital. I traded my N-80 Nikon camera body for the D-70. It was a little strange at first, not to have FILM that I could hold in my hand, but ultimately, I think this step will save me a lot of time.

Sugar Maple Leaf


Sugar Maple Leaf, May 14, 2003
There were lots of beautiful wildflowers in bloom on the day that I made this photo, but somethng about this leaf lying on this log attracted my attention. I guess I was trying to be creative. I was attracted by its pattern and simplicity. Also, as I recall, it was getting a little bit windy, but unlike the wildflowers, this leaf was not moving around. This is where I found it, and this is where it stayed.
I like the way this photo shows the tissue-paper thin maple leaf that had fallen from its tree approximately six months before. Unlike oak leaves with lots of tannins to preserve them, maple leaves tend to lose their color and decay rather fast.
I also like the way this photograph shows the pattern of viens within the leaf, and how the main three viens radiate outward from a single point by the stem. This arrangement of veins is called palmate. All maple leaves have a palmate arrangments of their veins, though it not always as obvious as this.

Horsetail in Northern Michigan


Horsetail, May 14, 2003
I found this horsetail growing beside a wide trail in a forest in the upper peninsula (UP) of Michigan, just a few miles south of the Lake Superior shoreline. This tip of the horsetail is about the size of the top 2 inches (5 cm) of my pinky.
I walked around the plant and into a gully, then set up my Nikon N-80 with 200 mm micro lens pointing toward the horsetail, and lined up the film plane parallel to the horsetail's stem. Since nothing was growing in the trail behind the horsetail, I was able to avoid having distracting objects in the background of the frame. Using a small aperture (f 22) I focused on on the tiny horsetail, while throwing the entire background out of focus into a uniform shade green.

Woodland Spring Evening


Cottonwoods and Moon, May 13, 2003
When I made this photograph (using my Nikon N-80 and a 300 mm lens), I was standing on the Lake Superior shoreline shortly after sunset in the upper peninsula (UP) of Michigan. I had spent the day photographing wildflowers, and I decided to try this moonscape for a change of pace. At that time, I was living near Lansing, Michigan, but had driven several hours north to attend a week-long Rod Plank Photography workshop that focused primarily on spring blooming woodland wildflowers. It was a wonderful trip.
It was mid-May in the UP, and spring was in its early stages. Spring beauties were beginning to bloom, as were trilliums, toothworths, trout lillies, bloodroots, and dutchman's breeches. A group of 12 photographers, each day we hiked back into the forests to find wildflowers that had been mostly spared the disturbance of human activities. We found thick carpets of spring beauties and large patches wild onions (also called leeks or ramps) and patches of all kinds of other wonderful plants.
There is such thing as "love at first sight." I fell in love with that forest the first day. Even sitting here today, I can close my eyes and recall vividly certain familiar patches of that wonderful northern forest. I can see the colorful forest floor, speckeled with pink, white, yellow, and green. I can hear the woodpeckers hammering, and songbirds singing. I can feel the cool wind on my face as the bare branches of trees overhead sway and collide in the breeze.
After a fantastic and somewhat exhausting week of photography, I headed home with a couple dozen rolls of slide film waiting to be processed and eventually scanned. And as I drove south along route 75, it was like driving ahead--fast forward--through time. The leaves on the trees started off bare in the UP, but became increasingly more and more leafy as I headed south toward Lansing. By the time I got home, the forest floor was almost completely in shade. Instead of finding spring beauty and its early companions, I found columbine, Solomon's seal, and wild geranium--some of the later blooming, and more shade tolerant wildflowers.

Sunday, October 02, 2005

Spring Beauty Sprout


Spring Beauty Sprout, March 10, 1996
This spring beauty sprout is less than 1 inch high, and my camera was just a few inches away. This is a HAND HELD snapshot using a Cannon AE-1 with my 50 mm macro lens. I was not doing a photo shoot. I was taking a nature walk with a friend. I didn't expect to find much growing since it was still early in the year, and there were numerous patches of snow on the ground.
As we walked along the trail, the forest floor was somewhat muddy. My boot accidentally kicked up some leaf litter while strolling along. I happend to glance down and could hardly believe what I'd found. There beside my foot was this tiny pink spring beauty sprout growing through a small patch of snow.
Photo shoot or not, tripod or not, I had to give this shot a try! So I plopped onto the soggy ground and propped my camera as carefully on a lump made of curled-up mittens, using part of my hand to help keep the camera steady. I shot several frames, during which time the clump of snow visibly melted! I had to hurry and cross my fingers as I shot the remaining roll of film. I was shooting negative film that day, like I said, because this was just a nature walk, not a photo shoot. A few days later, as I studied the prints, I was relieved to see that one of the images came out looking they way I had intended: crisp and clear, with with a substantial patch of snow still intact.
Interestingly, spring beauty sprouts always come out of the ground pinkish red, though most people don't notice them during this stage. Once the sprout comes in contact with the sunlight, it gradually turns more and more green as its chlorphyll develops. I love the way the flower buds are rolled up tightly in this photograph. Eventually, as the stem lengthens and the plant develops, the flowers will bloom sequentially, starting at the bottom of the stem and working their way toward the top.
[I scanned the negative using a film scanner, but now that I have a better film scanner, I ought to dig up the negative and try again. I think I can do a better job this time.]

Spring Beauty Flowers


Spring Beauty, April 4, 1996
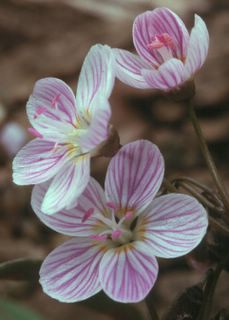
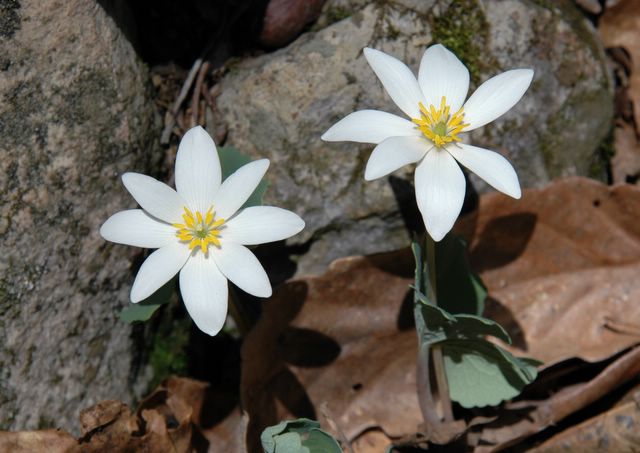
The spring beauty flower has 5 petals. Each petal has pink veins that can range from very pale to very bright. The leaves, usually in pairs, are long and thin--the shape of grass blades, but thicker and more succulent. The leaves feel cool and rubbery to the touch (except in the sun, and then they feel warm).
In forests that have been spared grazing, plowing, and clear-cutting, spring beauty can form an amazing thick pink carpet across the forest floor! However, most forests have only occassional patches that are NOTHING like the original carpets that used to fill the eastern forests of the United States. A few "wall to wall" carpets remain, and if you find one, count yourself lucky!
This photo, a scanned negative, was taken using my old Cannon AE-1 with 50 mm macro lens, and a life-size converter that has the effect of turning this into a 100 mm lens. There isn't much working distance, however, so I had to get really close! This is unfortunately one of my best photos of spring beauty so far. I plan to remedy this "problem" in spring 2006.
This photo was taken near peak blooming time in a forest of eastern Iowa. During peak blooming time, you can sometimes find 3 or 4 flowers in bloom on a single stem, when usually you would find only 1 or 2. Flowers bloom in a predictable sequence, starting at the bottom of the stem and working their way toward the top.
I like this photograph because it shows the different stages of the spring beauty flower. During the first day that the flower is open, it is in the "male" stage (see top flower). Its five stamen, covered with bright pink pollen, stand tall in the middle of the flower. Any bees that visit will surely take some of this pollen with them as they fly off to another flower. On the second day, the stamen have moved toward the outer edges of the flower, and the flower enters its "female" stage (see middle flower). At this time, the stigma (in the center of the flower) opens so that it can receive pollen brought by the bees. Once pollinated, the flower will close up rather quickly, its petals will shrivel up, and eventually anywhere from 1 to 6 seeds will develop. If the flower is not pollinated on its first day open, it will likely open again in the female stage the next day (see bottom flower) for another try at pollination.
Weather can interefere with this process, however. For example, suppose the weather is cold and/or cloudy and/or rainy on its second day. Though the flower is "supposed" to be a female that day, it may not open at all. If the weather is warm and sunny the third day, that same flower may open as a female, but it may have lost its chance. So much depends on the weather.
As for bees, well, they also play a role in determining the plant's reproductive success. Early in the year, when it's cold, there are very few bees. However some flies, which resemble bees, and are often called "bee flies" do come out and start the process of pollinating some of the earliest flowers. As the weather gets warmer, bees become more common, and most flowers receive several visits from bees during the day. The early-blooming flowers often miss out on getting pollinated, and the later ones often don't have time to finish making their seeds before senescence sets in. But, since each plant produces an inflorescence with about 6 to 20 flowers, each plant usually makes dozens of seeds each year.
That is a brief introduction to spring beauty. Dare I say that I could write a whole thesis on this topic (and it would surely put you to sleep). But, forget data tables and graphs: I prefer to show pictures and tell the story!

The Flowers' Perspective

When I used to lead nature walks back in Iowa, I tried to get my "audience" to imagine the perspective of a wildflower on the forest floor. Even on a sunny day, we might be walking around in jackets and feeling the chill of the wind, but I'd drop down to the ground and and lay an outstretched hand across the leaf litter of the forest and ask other people to do the same. We could feel the sun "burning" the backs of our hands and we could feel the heat rising up from the dead dry leaves beneath our palms. Beneath the wind, the forest floor felt surprisingly warm. The sun beat down with an amazing intensity.
Plants need the energy from sunlight to develop, reproduce, and (if perennial) store food for the following year. Plants that thrive on the forest floor have only a small window of opportunity for growth between the frosty cold days of winter and the hot shady days of summer.
As part of my graduate research project in ecology, I was required to do more than just "imagine" the perspective of a wildflower. After all, I was training to become a SCIENTIST, so I was required to collect DATA--preferably something that could be quantified and, better yet, plotted in a graph!
So each week from March through May, I went out to 12 different locations in the forest where I was studying pollination and seed production in spring beauties (Claytonia virginica). At each site, I set up a fisheye lens (perfectly level) so that I could record and quantify changes in sunlight throughout the season. The fisheye lens captures the view across all horizons, showing which portions of the sky allow light to pass through, and which portions of the sky do not. Using a digitizer, I was able to measure the area of unobstructed sky overhead. But you don't need a fancy computer to see the changes!
Even a mere glimpse of three fisheye photos is enough to show that the sunlight decreases dramatically as the season progresses. Early in the spring (March 7, 1987), only bare branches of trees and shrubs, as well as nearby hills, block the light of the sun. For the most part, a wildflower “sees” sunshine all day long, from sunrise until sunset.
As the season progresses (April 25, 1987), leaves develop overhead, casting larger and larger shadows as they grow. The forest floor becomes speckled with shade and sun that moves across the forest floor as the sun moves across the sky. Around this time, many of the early spring perenials are well into the process of making seeds and storing energy for the following year. Time is running out surprisingly fast.
Near the end of the season (May 12, 1987), especially after a few days of constant rain, the leaves fill in rapidly allowing very little light to pass through to the forest floor. At this time, the ephemeral spring perennials undergo senescence and remain dormant until the following spring—when temperatures rise sufficiently to begin the cycle all over again. With any luck, many of the seeds reached maturity and will be dispersed across the forest floor.

Thanks to Visitors

Thanks very much to everyone who has contacted me to tell me that they are enjoying my new website. I am enjoying it too, incase it wasn't obvious! I spent the weekend out of town, but plan to start working again tomorrow. For those who have missed some of my earlier posts, please look in the right-hand column under ARCHIVES and click on September 2005. This will allow you to see ALL of the first two weeks worth of posts. If you just look at this page, you will miss things like Maybry Mill on the Blue Ridge Parkway and several other shots. Eventually I plan to sent up my own (non-blog) website, which will be organized in a more "logical" way, but that will come later, after I have had more time to plan. In the meanwhile, I don't want to waste time. I want to get my pictures and ideas out there for people to see.
I have been holding back for, gee, more than ten years, and it is finally time to WRITE about the topic that seems to inspire me most... WOODLAND SPRING. And even as recently as this evening, as I observed the sunset on the mountains of West Virginia, I considered whether maybe I need to start a parallel page called WOODLAND FALL!!! And then WOODLAND WINTER and WOODLAND SUMMER, not to mention OTHER, because I still need a place to share my photos of Utah and the Badlands and other things.... The flood gates are open and you can expect to see much more during the next several weeks. But thanks again to everyone who has told me they appreciate my work. As much I as love doing this for me, I love also knowing that other people appreciate my work too!